Creating an Encrypted Vault on Windows

Introduction
You may have already set up BitLocker on your PC, which is great for protecting your data in cases of hardware loss or theft, but have a need to further securely compartmentalise your data. For example, you may want to keep personal and professional files totally seperate and encrypted in multiple vaults with different passwords. In this guide I'll show you how to set up a vault on your PC.
Creating the Virtual Hard Disk
First, we need to create a Virtual Hard Disk that will house the contents of your Vault.
In simple terms, a Virtual Hard Disk (VHD) is just a single file that the operating system and all your applications can access as you would an external hard disk or USB drive.
- Open Disk Management: Right-click on the Start button and select
Disk Management. - Create VHD: In the menu, choose
Action → Create VHD. 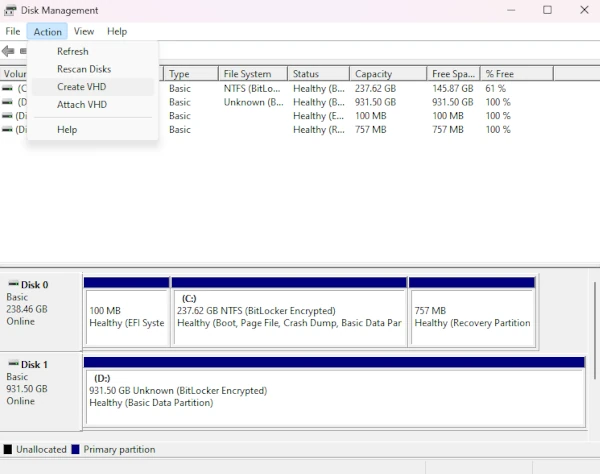
Disk Management: Create a VHD (Windows 11, Professional Edition)
- Configuration: Specify the location, size, and format.
Create a VHDX if you want to make a large vault, or you will not be opening the vault on older versions of Windows.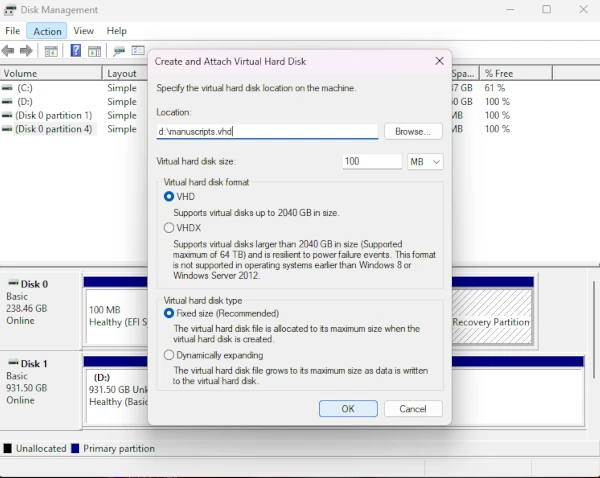
Disk Management: VHD configuration (Windows 11, Professional Edition)
- Initialize Disk: Right-click on the new disk (you may need to scroll down in Disk Management to see it) and select
Initialize Disk. When selecting a partition style, go with GUID Partition Table (GPT). - Create New Simple Volume: Right-click on the unallocated space, select
New Simple Volume and follow the wizard to format the volume as NTFS. Take note of the drive letter assignment, for example E: 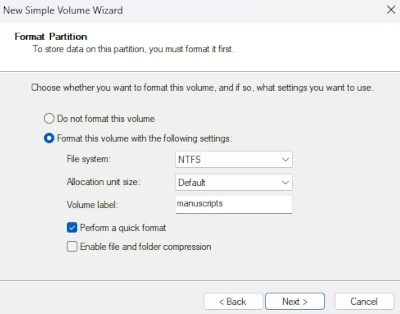
Disk Management: Formatting the VHD (Windows 11, Professional Edition)
Encrypting the Virtual Hard Disk
These next steps turn your Virtual Hard Disk into an encrypted Vault, which can only be opened with the correct password or passphrase:
- Open File Explorer: Navigate to the location of the VHD.
- Mount the VHD: Double-click the VHD to mount it.
- Turn on BitLocker: Right-click the new drive letter (eg E:) in File Explorer, select
Turn on BitLocker and follow the wizard to encrypt the drive.
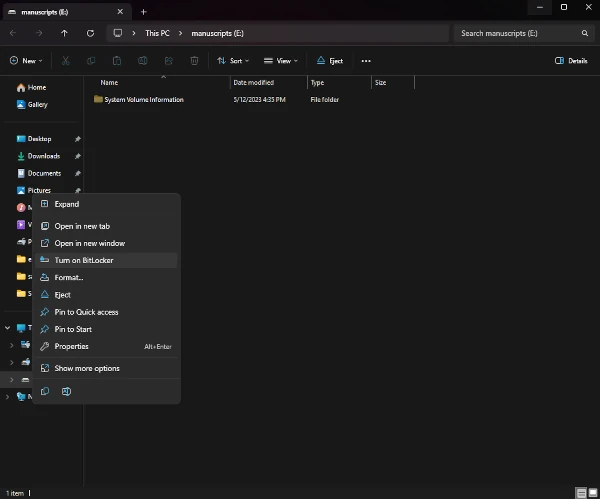
Windows Explorer: Turning on BitLocker (Windows 11, Professional Edition)
Contingency Plan
When creating a vault on your PC you are given the option to upload a recovery key to your Microsoft account. This is not ideal and comes with several security drawbacks. If you avoid the cloud backup, your family and associates will not be able to access your vault in an emergency, for example in the event of your death or incapacitation. In this case it is important to have contingencies in place to ensure access without compromising security, a solid choice is utilizing Keycrypt to securely prepare and distribute physical shares of your encryption passphrase. 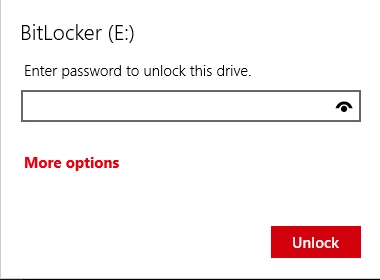
Mounting a Vault file: Password Prompt (Windows 8 or above, any edition)
Conclusion
By creating an encrypted Virtual Hard Disk, you can effectively create a secure vault on your PC for sensitive data. This method is especially useful for separating personal and professional information with distinct encryption keys. Please be aware that the contents of your vault is accessible to Windows, running applications and other users of your PC while your vault is open and mounted as a disk. For your safety, be sure to keep your PC up-to-date and free of malware. You should eject your vault (like you would any external disk) when it is not required or in-use.
`This method of vault creation is for Professional editions of Windows; yet any edition is able to open these vaults, making them a handy way to securely compartmentalise and move work between your various PCs.'