Creating an Encrypted Vault on Mac

Introduction
You may have already set up FileVault on your Mac, which is a fine solution for protecting your data in cases of physical loss like your MacBook getting stolen, but have a need to further securely compartmentalise your work. You may have a need to keep personal and professional files totally seperate and encrypted in multiple vaults, each with different passwords. In this guide I'll show you how to set up a secure vault on your Mac for free, using only built-in tools already available on macOS.
Creating the Vault
Creating your Vault on macOS is a very straightforward process. We simply create an encrypted Virtual Hard Disk that will house the contents of your Vault. A Virtual Hard Disk (called a Disk Image on Mac) is just a single file that the operating system and all your applications can access as you would an external hard disk or USB drive.
- Open Disk Utility:
Applications → Utilities → Disk Utility. - Create the Vault: In the menubar, choose
File → New Image → Blank Image. 
Disk Utility: Create a Disk Image (Modern versions of macOS)
- Configuration: Specify the location, size, format, encryption mode and password.
Be sure to make it an APFS volume using 256-bit AES encryption, with a GUID partition map as a read/write disk image.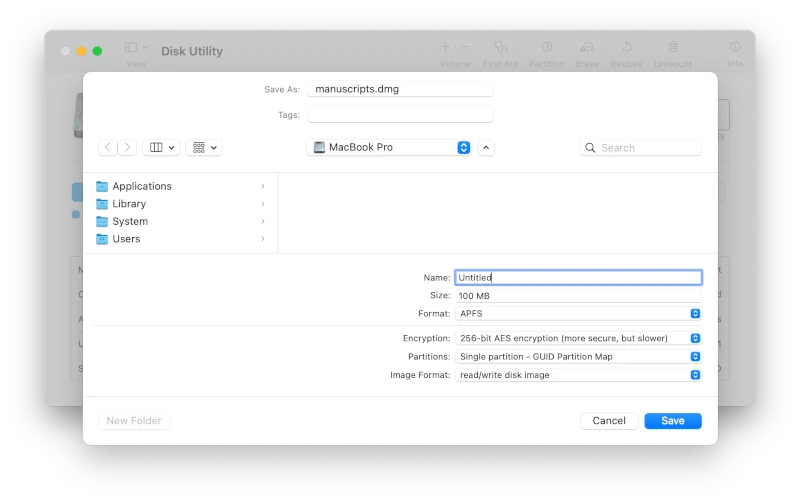
Disk Utility: Disk Image Configuration (Modern versions of macOS)
- Saving the Vault: Click save and your Vault will be created at the location you specified.
Once the vault file has been created, you can simply double click it's dmg file to enter your password and mount it.
At this point, it will appear as a removable disk on your desktop and in Finder so you can edit, create or move files to and from the vault with ease.
Contingency Plan
If you don't disclose your password, your family or associates will not be able to access your vault in an emergency, for example in the event of your death or incapacitation. In this case it is important to have contingencies in place to ensure access without compromising security, a fine choice would be to use Keycrypt and securely prepare, then distribute physical shares of your encryption passphrase.
Conclusion
By creating an encrypted Disk Image, you can effectively create a SecureVault on your Mac for sensitive data. This method is especially useful for separating personal and professional information with distinct passwords and encryption keys. Please be aware that the contents of your vault is accessible to macOS, running apps and other users of your Mac while your vault is open and mounted. For your safety, be sure to keep your Mac up-to-date and free of malware. You should eject your vault (like you would any external disk) when it is not required or in-use.
`This method of vault creation is for any version of macOS; making it a handy way to securely compartmentalise and move work between your various Apple machines.'